Showing posts with label Quilt. Show all posts

Wednesday, September 11, 2013

Big Star Baby Blanket

Today's tutorial is for a quilt that I made ages ago and shared at the Sewing Rabbit.  We recently found out that the baby this was intended for is going to be a little girl! We are so excited.... but I might just have to make another of these in pink!


Big Star Baby Blanket-- this is the best, easiest starter quilt... and actually doesn't require any quilting! Free pattern and tutorial: www.makeithandmade.com

I know that not a whole lot of quilting goes on at the Sewing Rabbit; so I designed the Big Star Baby Blanket  for non-quilters. The quilt top is a single over-sized 8 point star block-- so you only have to put together one block!  Also, the instead of being quilted and bound, the top and backing are simply turned and topstitched-- the blanket is small enough that it doesn't need to be quilted.

It's a great way to get your feet wet with quilting without spending hours and hours quilting and binding a large quilt made from small pieces.
Big Star Baby Blanket-- this is the best, easiest starter quilt... and actually doesn't require any quilting! Free pattern and tutorial: www.makeithandmade.com

The finished quilt is sized 40x40, which is a perfect size for a stroller blanket or playmat for babies and toddlers alike. This tutorial will take you through making the quilt top; and offer a few tips on how to finish the quilt.
Big Star Baby Blanket-- this is the best, easiest starter quilt... and actually doesn't require any quilting! Free pattern and tutorial: www.makeithandmade.com

Materials:

To make the quilt top you will need:
8 10"x10" squares; 2 of each print. (These can easily be cut from 4 fat quarters)
3/4 of yard of a backing fabric

For the back of quilt you will need:
1 1/2 yards of backing fabric


Start by cutting the background fabric and the prints into 10 x 10 inch squares. When you are finished you will have 8 10 inch print squares (2 squares of each fabric) and 8 10 inch background squares.

Big Star Baby Blanket-- this is the best, easiest starter quilt... and actually doesn't require any quilting! Free pattern and tutorial: www.makeithandmade.com
Rearrange your squares into pairs so that one square from each print is paired with a background fabric, and the other square from that print is paired with another print. (You will have 4 background squares left over).
Big Star Baby Blanket-- this is the best, easiest starter quilt... and actually doesn't require any quilting! Free pattern and tutorial: www.makeithandmade.com

Iron each square in half across the diagonal as shown.
Big Star Baby Blanket-- this is the best, easiest starter quilt... and actually doesn't require any quilting! Free pattern and tutorial: www.makeithandmade.com

And then place the square right sides together with it's pair. 

Big Star Baby Blanket-- this is the best, easiest starter quilt... and actually doesn't require any quilting! Free pattern and tutorial: www.makeithandmade.com
Sew a quarter inch from both sides of the ironed crease as shown (I darkened the stitching lines with pencil in the picture below.)
Big Star Baby Blanket-- this is the best, easiest starter quilt... and actually doesn't require any quilting! Free pattern and tutorial: www.makeithandmade.com
Slice the block along the ironed crease; right in the middle of the two stitching lines. You should have two identical blocks that look like the one below. Press each block flat with the seam allowance pressed to one side. Do this for each pair of blocks to make a total of 12 half square triangles.
Big Star Baby Blanket-- this is the best, easiest starter quilt... and actually doesn't require any quilting! Free pattern and tutorial: www.makeithandmade.com

Cut the 4 extra background blocks to 9 1/2 inches.  I highly recommend squaring up all pieced blocks to 9 1/2 inches at this point as well. If you don't have fancy quilting rulers, don't worry-- here's a tutorial on how to square up blocks with or without a square ruler.

Once the blocks are square; lay them out in the 8 point star pattern as shown below.
Big Star Baby Blanket-- this is the best, easiest starter quilt... and actually doesn't require any quilting! Free pattern and tutorial: www.makeithandmade.com
Sew the blocks together to form horizontal rows first. Press all the seam allowances in the first row (Row A) in one direction, and then the alternate direction for the second row (Row B).
Big Star Baby Blanket-- this is the best, easiest starter quilt... and actually doesn't require any quilting! Free pattern and tutorial: www.makeithandmade.com


Then sew the horizontal rows together (Row A to Row B etc... ) Press these seams open for a finished blanket that lies very flat. This is the most tedious part of the quilt-- but luckily there are only 3 seams to press open!

Big Star Baby Blanket-- this is the best, easiest starter quilt... and actually doesn't require any quilting! Free pattern and tutorial: www.makeithandmade.com


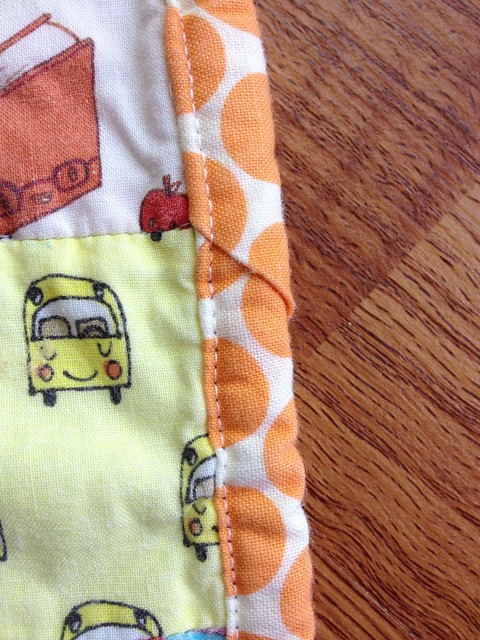
And your top is all finished! Now you can back and bind your quilt in any way you choose. I decided to sew my quilt up like a receiving blanket. I put the top and back right sides together and sewed around the edges leaving a small hole for turning. Then I simply turned and topstitched my quilt for a modern finish.

With 3 lines of stitching securing the edges; I think this blanket will just as durable (and fun for babies to chew on) as a traditionally bound quilt. Since there isn't any quilt batting; there is no need to quilt this blanket (although you could if you liked!)


Big Star Baby Blanket-- this is the best, easiest starter quilt... and actually doesn't require any quilting! Free pattern and tutorial: www.makeithandmade.com
You can read more about making the quilt... and hear my sentimental rambling about what I used for the batting in my original Big Star Baby Blanket post.

Wednesday, August 21, 2013

Kid Made Nature Batik Quilt with Rachel Rabbit!

Have you noticed MIH's newest sponsor, ZipIt? Zip It zippers is the only place that I've bought my zippers for years, and I'm absolutely thrilled with them each and every time. They now have trendy metal zips and invisible zips at much better prices than your local fabric store.


I'm absolutely thrilled to have Rachael from Rachael Rabbit over to share a Create With Kids project. I was absolutely floored when Rachel sent me a link to her blog-- and spent the next hour of my life reading her archives.

It's full of projects that you can do with even the youngest of kids. Even though her kids don't use the sewing machine, it's their work, style and creativity that's showcased in these projects. Before we get to the amazing project she's sharing today, I just have to highlight some of her (and her kid's!) past work.

This Kid Painted Tee Pee is just dreamy-- Her kids painted the fabric, and then she sewed up the tent. How fun for the summer!
Kid Painted Teepee

My favorite project of Rachael's is this quilt. Can you imagine how proud her daughter must be? It's absolutely gorgeous.
Kid Made Nature Batik Quilt. Use objects from nature as a resist and create a gorgeous quilt using batik dyes.

She wins the award for Coolest Mom Ever for coming up with this idea! Paint bombs!  Another kid painted quilt in the making!
Kid Made Nature Batik Quilt. Use objects from nature as a resist and create a gorgeous quilt using batik dyes.

And now she's sharing how to make this Gorgeous batik blanket-- with your kids. I can't wait to try this!

I am very excited that this post is being featured at Make it Handmade.
Kid Made Nature Batik Quilt. Use objects from nature as a resist and create a gorgeous quilt using batik dyes.

My girls love anything that involves copious amounts of glue and spray bottles. This project held their attention for 1+ hours - which I think must be a record for us!

Kid Made Nature Batik Quilt. Use objects from nature as a resist and create a gorgeous quilt using batik dyes.

For this project I used:
  • a piece of plain white muslin/cotton
  • a bottle of Batik EZ (you might be able to substitute this with a liquid washable glue like Elmers) I poured the Batik-EZ onto a craft tray - but I think you could use any vessel as long as you can dip your leaves into
  • cotton balls
  • spray bottles
  • fabric paint - I use BioColor paint with their BioColor Fabric medium - it is non toxic and certainly works!
  • leaves and flowers from around the garden
  • plastic sheet - I just used a large black bin liner cut down one side to protect our patio
  • additional fabric for the border, backing and binding
  • batting

The girls were told to dip things into the Batik EZ and then place them on the fabric. Our aim (I say 'our aim' but really is was 'my aim') was to make a sky with clouds in the middle and leaf prints and grass on the outer edges.

Putting the cotton balls apparently was boring and the girls wanted to move on to cutting leaves off plants and sticking them down asap. Once they had finished with the cotton balls I just emptied the remaining balls from the bag into the middle of the fabric - no additional Batik EZ.

Kid Made Nature Batik Quilt. Use objects from nature as a resist and create a gorgeous quilt using batik dyes.

There was some consideration to where every leaf or flower should be put.


Find a leaf, dip and stick. They didn't seem to tire of it. 

Kid Made Nature Batik Quilt. Use objects from nature as a resist and create a gorgeous quilt using batik dyes.

Everything was precisely placed.

Kid Made Nature Batik Quilt. Use objects from nature as a resist and create a gorgeous quilt using batik dyes.

Here is our finished fabric after the cotton balls and leaves were all stuck down and they declared the project to be 'done'.

Kid Made Nature Batik Quilt. Use objects from nature as a resist and create a gorgeous quilt using batik dyes.

What they didn't realize was that after lunch - once everything had dried we got to spray everything. I used four colors - two green tones and two blue tones - I also watered down the BioColor Paint and Fabric Medium combo so the paint would be lighter.


My four year old was good at following the 'blue in the middle for sky' & 'green around the outside for grass' instructions. But my 2 year old just sprayed what ever and where ever she fancied. 


Here is our fabric after the spray paint. We left it to dry in the sun & then I moved it into our boiler room where it sat for 5 days - just to make sure.

Kid Made Nature Batik Quilt. Use objects from nature as a resist and create a gorgeous quilt using batik dyes.

To remove all the leaves and cotton balls I just soaked the fabric in cold water. Everything came off very easily - but the waxy coated leaves (Ivy & Lillie's leaves) came off the easiest. I put the fabric into the washing machine and ran it on a hot cycle & tumble dried it on a hot cycle too.

Kid Made Nature Batik Quilt. Use objects from nature as a resist and create a gorgeous quilt using batik dyes.

Once I had added a simple border to the fabric I layered, quilted and bound the picnic blanket.

Kid Made Nature Batik Quilt. Use objects from nature as a resist and create a gorgeous quilt using batik dyes.

I don't think you need to quilt your picnic blanket like I did - you could tie it if that is easier. If your children are older you could also get them to outline the leaf shapes with a fabric marker. There are many directions you could take this idea.

Kid Made Nature Batik Quilt. Use objects from nature as a resist and create a gorgeous quilt using batik dyes.

The girls LOVED having a fairy tea party in the garden with their new picnic mat.

Kid Made Nature Batik Quilt. Use objects from nature as a resist and create a gorgeous quilt using batik dyes.

You can tell these kids are somewhat English by their tea party skills!

Kid Made Nature Batik Quilt. Use objects from nature as a resist and create a gorgeous quilt using batik dyes.

After the tea party was over the girls set about inspecting the clouds & leaves on the blanket.

Kid Made Nature Batik Quilt. Use objects from nature as a resist and create a gorgeous quilt using batik dyes.


Thank you so much for sharing this tutorial Rachael! Our weather is cooler now, and this is a perfect time to pick leaves and twigs to work on this project.

If you liked this post, head on over to Rachel Rabbit to see more of her awesomeness. Rachael's also collecting fabric for a charity quilt-- check out this post for all the details. We'll see you back here on Friday for more handmade fun!

Friday, August 2, 2013

Handmade Confessions: Toni From Hoosier Toni

I'm so excited to introduce Toni from Hoosier Toni for today's Handmade Confession. I'm not quite sure how I found Toni's blog-- but I'm so glad I did!

She's an incredibly talanted quilter who is gracious enough to share her projects with us. I love this baby quilt-- so on trend with those colors and angles.
She calls this one her Dead Simple Quilt. I never considered doing an all solid quilt, but after seeing this I might just give it a try!
And everytime Toni blogs about this gorgeous chicopee quilt, I just have to run my mouth about how much I love the colors. I've seriously made the same comment on her blog 3 times! But just for old times sake-- Toni, the colors on this quilt are striking! I love it-- where did you get that fabric?

I

And now, she's going to divulge a quilt binding secret with us. A woman after my own heart-- stickin' it to the bias tape mafia! This little tip just blew my mind!


I admit, when Palak first asked me to be a part of this wonderful series, I was completely stumped about what I could possibly share. I don't exactly have any deep dark secrets or juicy confessions to divulge, so I was at a loss. Then it hit me....Toni, you're lazy!! 

So there it is, my confession to you: I'm lazy.

Untitled 

See this box of jeans? My husband's friend dropped them off at my house in April so I could hem them for him. Yes, you read that right...in April! I sew nearly everyday but somehow I still have not finished these jeans. I have done one pair, but somehow they legs ended up different lengths and I got irritated and quit. Do I feel bad that they are still here? Yes. But obviously not enough to work on them. 

Geranium top 

And this cute Geranium top that I made my daughter a couple of months ago? Never been worn because I haven't sewn on the buttons. Lazy! It would probably take 5 minutes to make the buttonholes on my machine and another 10 to actually sew them on. Maybe I'll get it done before her first birthday next week...

But today I am also going to share a way that my laziness has helped me. I used to hate attaching bindings to my quilts and other projects! It was such a pain when you got to the part where you join the binding pieces together before you finish sewing them on. So many of the tutorials that I read had you sew it on almost all the way, then stop, measure, pin, sew, press, sew...Blah! Too many steps.

 So here's the way I do it. Now remember, I'm lazy, so I'm not going to go through the entire binding-making process, I'm just hitting the highlights here. Also, I tend to explain things in a confusing way, so hopefully the pictures help! 

Once you have your binding strips sewn together to the desired length and pressed in half, take the beginning of your strip and fold it at a 45 degree angle, as pictured, and press. Then trim it 1/4" away from the crease, and fold back over so your binding strip is back to being half it's width.

My creation

Pin your binding to your quilt or other project and start sewing about 1.5" to 2" away from the lower folded edge. This is creating a little pocket for you to slide the other end of the binding into in just a minute.
binding 

Continue attaching the binding to your project as usual but when you get an inch or two away from the beginning of the binding, stop and trim off any excess that goes more than 1/2" past the "pocket" that I referred to earlier. Make sense?

binding, part 2 

Now just slide the end of your binding strip into the pocket and continue stitching the binding to your project, being sure to keep it taut as you sew. Once you have finished stitching, backstitch a couple of times and you're done with the hardest part. Then just fold your binding and attach to the other side in your desired way. Here's how it looks from the front:

Untitled

About half of the time I decide to handstitch the pocket closed, but honestly it has never been a problem when I haven't done it. 

Untitled 
This is an I-Spy place mat I made for my kids about two years ago. You can see that I didn't stitch the pocket closed, but even after being washed countless times it hasn't been an issue. I'm sure many of you are horrified at my lazy approach, but it works for me!

Thank you so much, Palak, for letting me embrace my laziness! 

Toni, thank you so much for sharing! We are most definitely not horrified. I just wish you had told me about this before I made all that binding for the Leftover's Quilt! Anytime you want to embrace your laziness, come right on over-- we can be lazy together. If you've ever been a lazy seamstress, head on over to Toni's blog and give her some comment love!

Friday, July 5, 2013

Leftover's Quilt: Progress, Progress and a plea for help!


Leftovers Quilt By Make It Handmade
Add caption
 I had a million things to do on my 'day off' yesterday... so I did this instead:
Leftovers Quilt By Make It Handmade
I finished the quilting on the leftover's quilt! Now I just have to bind it.I'd been saving this yard of Robert Kaufman stripes for an embarrassingly long time; just for this quilt. But my husband wasn't crazy about it.
Leftovers Quilt By Make It Handmade

I shouldn't have asked him in the first place-- but now I'm second guessing myself. I'd put it on the bias like this:

Leftovers Quilt By Make It Handmade

What do you all think? Stick with this, or get something new? I'd love to hear your opinion!

ETA:  The KID Short's giveaway ends on Sunday! Make sure you enter before then! 

Wednesday, June 26, 2013

The Big Star Baby Blanket! Free Pattern!

Do you all remember that sneak peek I posted last week? Well, the pattern is finally up! Head on over to the Sewing Rabbit to get the tutorial.
The Big Star Baby quilt!A perfect quilt for beginning quilters.  Pattern and Tutorial by Make It Handmade

I'm excited about this blanket/quilt. It's a great introduction to piecing, matching seams and half square triangles-- all while creating a classic quilt design. Sigh... I love the 8 point star!
The Big Star Baby quilt!A perfect quilt for beginning quilters.  Pattern and Tutorial by Make It Handmade
 The quilt is actually not quilted at all-- it's turned and topstitched (which is also called 'birthing a quilt'). This eliminates all that basting, batting and binding that can sometimes intimidate beginners.
The Big Star Baby quilt!A perfect quilt for beginning quilters.  Pattern and Tutorial by Make It Handmade
 I also tried something new on this quilt-- I used a white on white print for the background. It's barely visible in the photos, but it add a lot of depth to the quilt in person.
The Big Star Baby quilt!A perfect quilt for beginning quilters.  Pattern and Tutorial by Make It Handmade

The blanket also has another secret-- Since I used an oh so soft and thin cotton voile for the backing, I sandwiched in a old, loved, worn, (but extremely clean and thoroughly  washed) flannel receiving blanket from my kid's baby years. The blanket was printed with stars, so if you look very, very, very, carefully, you can see tiny stars showing through the  grey backing.
The Big Star Baby quilt!A perfect quilt for beginning quilters.  Pattern and Tutorial by Make It Handmade

I'm ashamed to say, that sometimes when I make quilts or bags as gifts; I get a bit attached. It's hard to let go! This blanket is going to a very, very dear friend who is expecting her first little one-- and I'm so pleased to say that I don't have even a twinge of regret. I can't wait to give it to her!

If you'd like to make your own-- or just see more about how this blanket was made, pop on over to the Sewing Rabbit for the full pattern and tutorial!

Oh-- and a huge thank you to my husband for being a 'quilt model' and helping me take all these photos!