


The only thing is that garments aren't just straight lines. Since the serger trims and sews, serging curves can be intimidating and a little tricky.
Why serge curves?
Serging curves is the one technique that really speeds up my sewing. I most often use this technique when finishing off necklines and armholes for kid's clothes. Whether the serging is exposed or simply turned under, it eliminates the need for bias binding, lining or facing-- making summer playdresses quick and easy to make!And since the seam allowance is trimmed as you sew, serged curves don't require much clipping or trimming-- what a timesaver!
Convinced? Click the link below to learn to serge curves.

Set up your Serger:
First things first, let's get our sergers set up. I'm using the Brother 1034D- Remove your stitch finger
- Decrease stitch length
I've cut an inside cure and an outside curve out of this orange checked fabric. We'll finish the edges of them both today.

Serging Outside Curves
Serging outside curves (like you'd find in a sleeve shape) is very similar to sewing on a sewing machine. Going slowly, try to make sure the edge of the fabric is lined up with the serger blade. The open area in the Brother 1034D
Here's a close up the fabric lining up with the edge of the serger blade.

Serging Inside Curves
Serging inside curves (like on a neckline) is a bit more difficult. The trick here is to try and keep the fabric feeding into the machine straight. We do this by scrunching (technical term) the fabric to the left of the presser foot.

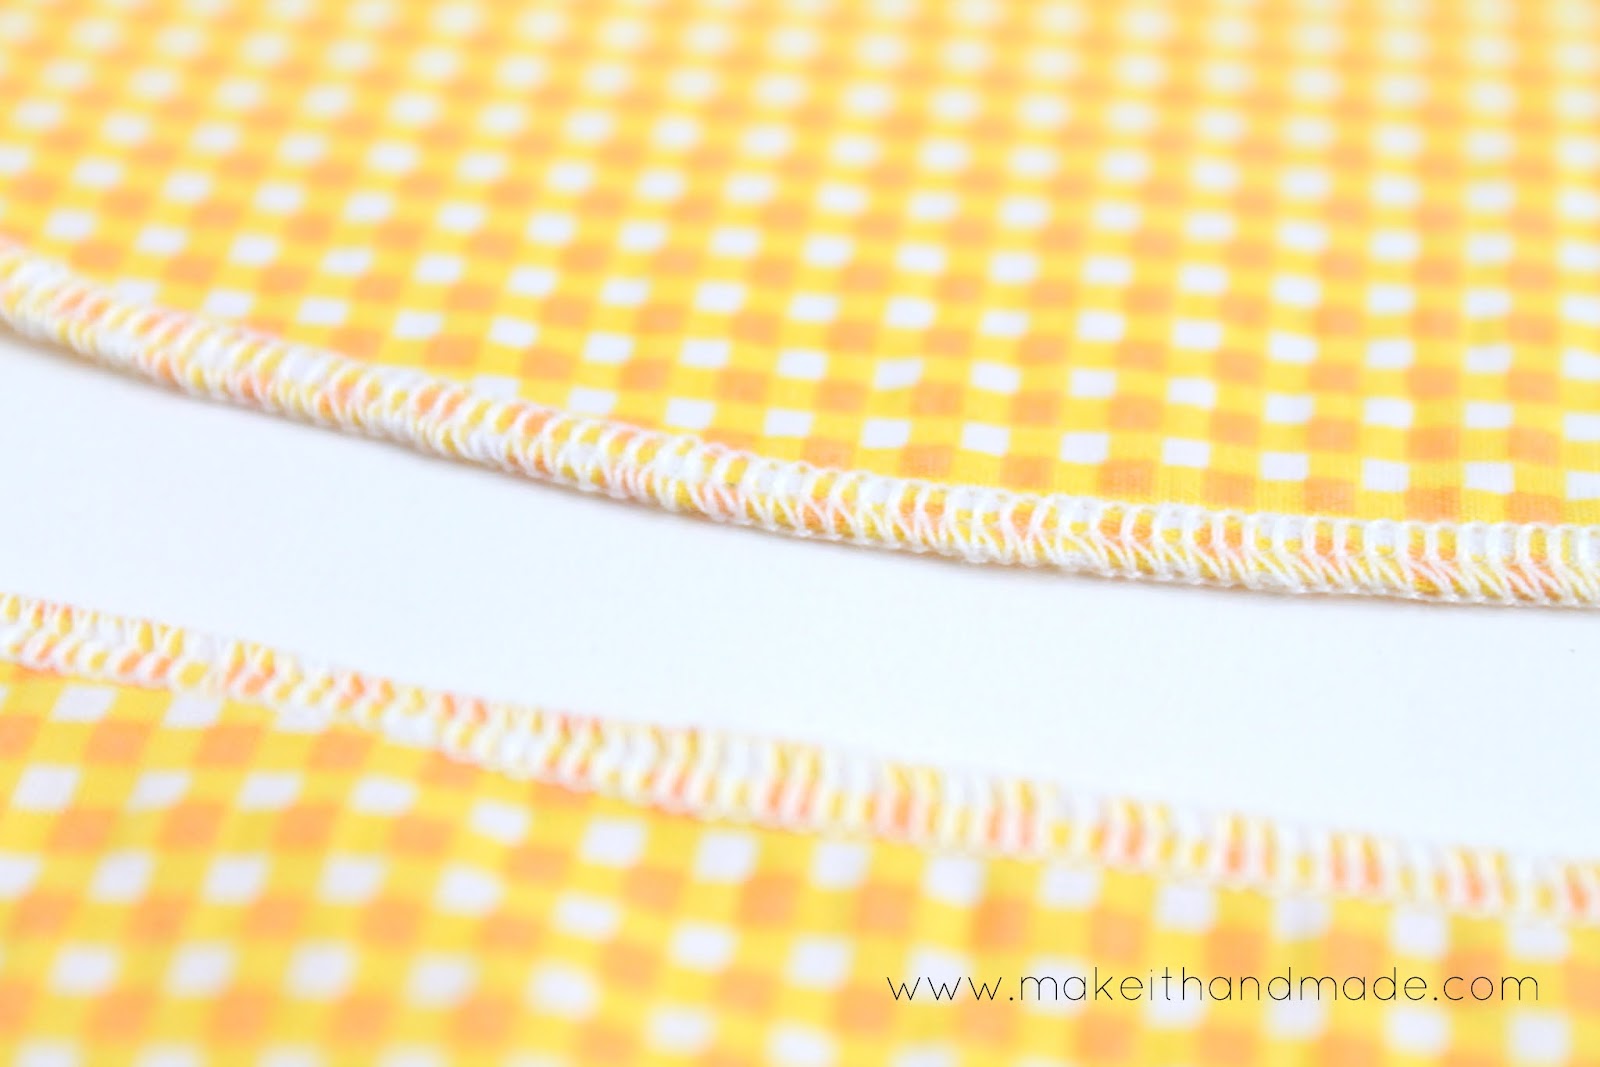
Here's both curves finished. Not bad, right? We've maintained the shape of the curve without any wonky stitching.

Here's a close up of the stitching.
Tips and Tricks
Here are a few tips:- Sometimes it can be hard to see if you are keeping the shape of the curve while you are serging. Check the trimmed off portion coming out of the serger. If it's even, you know you are doing a good job!

- If you do make a mistake, remove the piece from the serger and re cut the curve using the original pattern. It might mean that the neckline is slightly lower or the sleeve is a bit shorter, but you can salvage the fabric!
- Since serging curves will be easier if you are trimming very little off, cut your pattern down to use a quarter inch seam allowance.
If you give this a shot and have any questions, leave a comment or email me. If you have any tips of your own, I'd love for you to share in the comment box below.
Here are the other posts in the Relationship Rescue: You and Your Serger Series.
Week 1: Threading Your Serger
Week 2: Perfecting Serger Tension
Week 3: Understanding Your Serger's Features
Quick Tip: Threading a Serger Out of Order
I'll see you back here on Friday for a series wrap up!
These serging posts you are doing are amazing. I have always used my serger a lot and thought if more people could get use to it, sewing would become more popular as it is such a time saver and time is at a minimum for everyone. Thank you for posting these well done and informative lessons on serging. It was also fun to see you could delight at your daughters play; another creative person in the making.
ReplyDeleteSandra, thank you so much for your kind words! I agree wholeheartedly with your thoughts regarding serging. I admire handwork and couture finishing, and sometimes I do take the time use those techniques. But after becoming a mom, sometimes it's sew it fast, or don't sew at all!
DeleteMy husband asked me why I took pictures of my daughter playing in the flour-- I figure those pictures are payment for having to clean it up!
This is awesome! Thanks! When you do your wrap up, can you give a few hints as to how to hide the end of a serge? (i.e. serged edges that show)? I make a lot of children's clothing and like using the serged edge as decoration but you can always see where I start and stop. :(
ReplyDeleteNew to the serger....I am having severe issues with serging the crotch of shorts and pants....suggestions with that? The thread does not meet up with the edge of the fabric...I guess this is the overlocking portion
ReplyDeleteNew to the serger....I am having severe issues with serging the crotch of shorts and pants....suggestions with that? The thread does not meet up with the edge of the fabric...I guess this is the overlocking portion
ReplyDeleteThank you for these awesome tutorials. The serger just might win me over yet! It sat in the box for quite a while (years), but with great fear and trepidation I have been using it more this past year, This information will help so much!!
DeleteI love you. Seriously. I have the same serger and have been pulling my hair out trying to serge the crotch area on the pajama shorts my boys requested. I was about to give up when I stumbled across this tutorial. THANK YOU!
ReplyDeleteHi Palak! I'm so glad I found your serging tutorials. My machine had me crying in frustration at one point! Thanks to you we are now on speaking terms again. But I was hoping you could give me some advice about serging the fly front and crotch seams of pants. I'm fine with the straight and curves lines, but when it comes to serging into the notched out section below the fly facing, my serger cuts right into the crotch section, and the loops of serging comes away from the fabric. Could you do a short tutorial about serging awkward corners, or more specifically on fly fronts?
ReplyDeleteThank you for taking the time to put these instructions together. I have the same serger and just started using it a week ago. I'm excited to find a place where someone can explain the unknown. Thanks.
ReplyDeleteThanks for taking the time to put these instructions together. I have the same serger and I just started using it a week ago. So many questions and you have the answers. Thanks.
ReplyDeleteI know I'm super late to the party here, but I found your post google-searching curved serger seams. If you still respond to questions, can you tell me whether you clip the curves after serging? It would seem to defeat the purpose of a nice, enclosed finish, but I'm wondering if the curved/serged pieces look OK without clipping when they are flipped right side out.
ReplyDeleteNope, you don't have to clip! The curves lay flat and smooth without it. I think I have a seperate post on that somewhere...
Deletefound it! This post has an example of a circle turned out without clipping.
DeleteThanks so much for this!
ReplyDeleteThank you for this clear and well illustrated tutorial. Illustrations work much better for me than video as I can read and visualize at my own pace.
ReplyDelete