Showing posts with label Making Home. Show all posts

Monday, February 9, 2015

WPlus9 Cupcake Wrapper Die Review

After having a couple birthday parties under my belt, I've decided that cupcakes (trendy or not) are the way to go kids birthday parties.

They are easy to transport, and avoid the mess and hassle of cutting up a cake during the party. And they are cute! Well, most of the time. At my son's Bob The Builder party last year the chocolate cupcakes made the yellow cupcake wrappers look muddy brown. This year for my daughters party I decided to try making cupcake wrappers as a way to avoid this problem.

Finding wrappers that I liked was a problem. I wanted some that weren't tall enough to touch the icing, and covered the discolored wrappers completely.


 I searched high and low for some cupcake wrapper die that met my requirements. I finally settled on these dies from W+9.


What I love about these:


  • They are slightly shorter than store bought wrappers, so I can fit 4 to a sheet of inexpensive 8.5x11 cardstock. Other dies I looked at only fit 4 to a 12x 12 sheet. 
  • They have tabs and slots for closures so they are easy to secure closed on the day off the party
  • They have a pretty edge, but aren't overly feminine or masculine. (See how boyish the ones in the picture are!) 
  • They cover the entire cupcake paper. So many wrappers that I looked at were lacy or see through-- which didn't help with my chocolate bleed through pattern. 
  • And... they come with an optional accessory pack to decorate the wrappers with! 
Here's a quick rundown of how to put them together:

Since a standard sheet of paper won't fit through your diecutting machine, you'll have to cut your paper in half hamburger style. Be sure to place your die as vertically as possible since it's a tight fit to get two wrappers in each half.

 These would be so gorgeous done on pretty scrapbook paper. Since I was making so many (and I was on a budget) I ended up using plain paper, and then stamping it with a floral design. I looked through my stash for any floral stamps, and arranged them using a wrapper as a guide. I then used one of my large quilting rulers to pick up all the stamps at once.
 This way I was able to stamp each liner just once, and finish two dozen in just minutes. Score!
 The notches do an awesome job of holding the wrappers together, so you can store them flat until the time of your party.
 The accessory pack for the the wrappers is adorable too. The is a die for a bow and tails. It doesn't look like much once it's cut out...
 But it's so adorable once it's folded. I love that I was able to make the bow with just one glue dot-- super simple if you have to do a bunch.
 You can also play around with the tails to create different styles. There is also die for the paper ribbon that goes around the wrapper as shown on the blue cupcake wrappers from above.
 They just made my little cupcake display. Not a single one fell apart-- and they were so easy for little hands to hold!
 Looking at this picture from above you can kind of see how much darker the chocolate wrappers are in comparison to the vanilla, but the cupcake wrappers made everything look nice and consistent. They were super quick and easy to make, (and fun too). Next, I want to try stamping a personal sentiment on the wrappers when I make small batches as a gift! How cute would it be to deliver a cupcake that says "Happy Birthday" or "Thank You" on the wrapper? That's my kind of gift :)

I want to send a a huge thank you to W plus 9 for sending me the dies to use for this review. I was not compensated in anyway, and all opinions are my own.


Wednesday, January 29, 2014

The Remote Control Pillow

The super bowl is right around the corner, and that reminded me that we need to get ready. The Super Bowl is my favorite game, because it's the last one.  Don't tell my husband, but although I'm not not a huge fan of the sport, I do kind of miss the cozy fall sundays spent together with the family with the TV buzzing in the background. (I could do without the weekday games though!)

All this to say-- I'm resharing this fun Remote Control Pillow Tutorial I shared at I Heart Organizing last year. It's a simple sew, to be sure, but it's still extremely useful! I think it would be especially cute in team colors.

I came up with this remote control pillow to keep those remote controls right on the couch-- but out of sight.


Even if you've never sewn a stitch before, you can make this fun little pillow-- I promise. Pillows are a great beginner project. This tutorial will walk you through step by step, and if you get stuck; you can always email me and I'll do my best to help you out.

I've also created a compilation of free sewing tutorials especially for new sewists. If you've never used a sewing machine before, this series of tutorials will walk you through the basics of sewing. You'll have this pillow made in no time!
Want a way to hide those pesky remote controls? This clever pillow keeps those remote controls out of site, but right at hand. Sew one for yourself with this tutorial from Make It Handmade.

Materials:

  • 3 Fat Quarters
  • 1 14" Pillow Form 
  • Sewing Machine & Supplies
Let's Sew:

Decide which fabric you'd like to use for the pocket side of the pillow, and which you'd like to use for the pretty side.
Want a way to hide those pesky remote controls? This clever pillow keeps those remote controls out of site, but right at hand. Sew one for yourself with this tutorial from Make It Handmade.

 Cut each fat quarter into a 15x15 square.
Step 2: Fold the pocket piece in half, wrong sides together and topstitch 1/8 inch away from the fold.
Want a way to hide those pesky remote controls? This clever pillow keeps those remote controls out of site, but right at hand. Sew one for yourself with this tutorial from Make It Handmade.

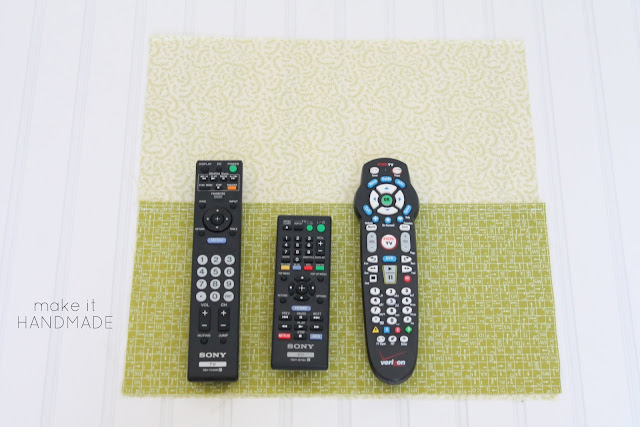
Step 3: Place the pocket piece on the right side of the pillow back. Using your remotes as a guide; mark out where the pocket needs to be divided, and topstitch in place.
Step 4: Place the remaining square (pillow front) right sides together with the pillow back. Sew around 3 sides of the pillow as shown.
Want a way to hide those pesky remote controls? This clever pillow keeps those remote controls out of site, but right at hand. Sew one for yourself with this tutorial from Make It Handmade.

Turn the pillow right side out through the little opening. Iron the pillow case out very well and then insert the pillow form into the pillow. The best way to finish the pillow is to hand sew the opening shut. For a super easy invisible stitch, check out my Magic Stitch Tutorial. If you are more adventurous, you can add an invisible zipper instead.

Now you have your very own, one of kind, customized throw pillow with attached remote control caddy.

To use, simply place the remote controls in the pockets to store. (Don't forget to tell your family where they are!)

Want a way to hide those pesky remote controls? This clever pillow keeps those remote controls out of site, but right at hand. Sew one for yourself with this tutorial from Make It Handmade.
 Turn the pillow pretty side out when your mother in law comes over.

I hope you give it a try! Please share and and pin if you like this post!

Monday, October 21, 2013

Icon Wall Stickers Review

A little while ago, I was contacted by Icon Wall Stickers who asked if I'd like to do a review of their stickers. I thought it would be perfect as part of our Making Home series.

I was impressed by the selection-- they have lots of items for babies and kids, along with some saying's for the home. The designs are innovative-- they have some corner pieces and fun floor to ceiling prints.  Be warned-- there are a few stickers that seemed to be geared more towards the college crowd and feature adult language.

They have really cute items for kids though-- I loved these dinosaurs and flowers!

The best part is that you can choose the color, size and orientation for each sticker. So it really is a custom item. I picked a racecar decal in orange for my son's room, and faced it so it would look like it was zooming out of the window.

I was so pleased by how the wall stickers arrived. My stickers were shipped in this awesome, sturdy cardboard tube. All the stickers were in perfect shape even though the package was all the way from the UK.
 To put the stickers up, first you have to get your helper move all your glow in the dark stars from where you want the stickers to go. See how textured our wall is?
 The stickers are really, really easy to apply. Here are the official instructions if you want to see how it works. I had my husband help me with putting this up, but I think I could have done it myself if I had to. For anything larger than this large sticker, though, I think having an extra set of hands would be a must.

The part that I liked best was that you can see through the paper backing easily to make sure you like the placement. My son was so excited at this stage!

Then it's just a matter of cutting away the backing and sticking it to the wall a section at a time. This is where having my husband help came in handy. He was able to hold the sticker out at a 90 degree angle while I smoothed the sticker down and made sure there weren't any bubbles.

 Then it was just a matter of peeling away the outer paper. We also had to go slow at this part to keep the thinnest parts of the decal from coming up with the paper.
 And voila! I was so impressed by how well the decal stuck to our textured wall. Since the vinyl is flexible, it really seemed to take on the texture of the wall. It looks almost painted on.  I think this would even work on brick or concrete walls.


Impressed? Well, I have great news! Icon Wall Stickers is offering a 25 dollar gift certificate to their shop for one MIH reader! Enter below via rafflecopter.


Have a great Monday, and I'll see you back here to see the featured posts from the Linky Party

Wednesday, October 16, 2013

The Twist Pillow

Psst... did you know that you get 10% off when you are a repeat customer at zip it? Just use the coupon code REPEATCUSTOMER at checkout! It's just one of the many reasons I love shopping with them!


Pillows are some of my favorite projects. Quick, easy and satisfying-- and you never have to worry about fit. They are also great projects for when you want to update something without spending a bundle. This little pillow is so fun to make-- and only takes a couple of fat quarters.The Twist Pillow-- Free tutorial for a fun smocked throw pillow. | www.makeithandmade.com
I shared this pillow at the Sewing Rabbit a few months ago, and now I'm sharing it with you all here! The Twist Pillow is a clever little pillow that looks difficult but is easy and fun to make. It works well with both tradtional and modern decor-- depending on the fabrics that you use.
The Twist Pillow-- Free tutorial for a fun smocked throw pillow. | www.makeithandmade.com


To make these pillows extra quick they cover is hand sewn shut-- no messing around with zippers! You'll have a brand new pillow (or two) for your sofa in under an hour!

Materials:

  • 1 fat quarter for the pillow front 
  • 1 fat quarter or 15 inch square for pillow back. 
  • 14 inch pillow form
The Twist Pillow-- Free tutorial for a fun smocked throw pillow. | www.makeithandmade.com

A note about choosing fabrics: Try to use either a solid, or a small scale pattern, so your smocking will be easy to see. I used this stripe leftover from my bike baskets. I love the bright colors and the way the stripes curve with the tucks.

The first thing we need to do is to create a grid on our fat quarter so we can space our pleats evenly. Instead of tedious measuring, we are going to use our iron to create our grid.

First, fold your fat quarter in half (hamburger style!) Using a hot iron, press to create a center crease. Open the fat quarter back up and then fold the edges into meet in the middle to make fourths...
The Twist Pillow-- Free tutorial for a fun smocked throw pillow. | www.makeithandmade.com
And then once again to make eighths...
The Twist Pillow-- Free tutorial for a fun smocked throw pillow. | www.makeithandmade.com
For the short side of the fat quarter, repeat the first two steps to divide into fourths. You should now have a 4x8 grid on your fabric.  Using a fabric marker (or a ball point pen!) mark out a diamond pattern like the one shown below on the wrong side of your fabric.

For the edges and corners, put your marks about a half inch in.
The Twist Pillow-- Free tutorial for a fun smocked throw pillow. | www.makeithandmade.com

Creating The Tucks:

Now for the fun part! I experimented with different ways of creating the tucks, and found that this  method worked the best for me. It creates a ton of texture without taking much time, and the tucks are secure and won't get pulled out.

We'll need to make a few changes to our sewing machine before we start:

  • Change to a short stitch length (I used .2 on my digital machine-- if you have a manual machine, just set it to 2 dashes above zero). 
  • Move the needle to the far left (if possible). 

To make a tuck, grab one of your marked dots and twist. Make sure that while you are twisting, you are looking at the wrong side of your fabric.
The Twist Pillow-- Free tutorial for a fun smocked throw pillow. | www.makeithandmade.com
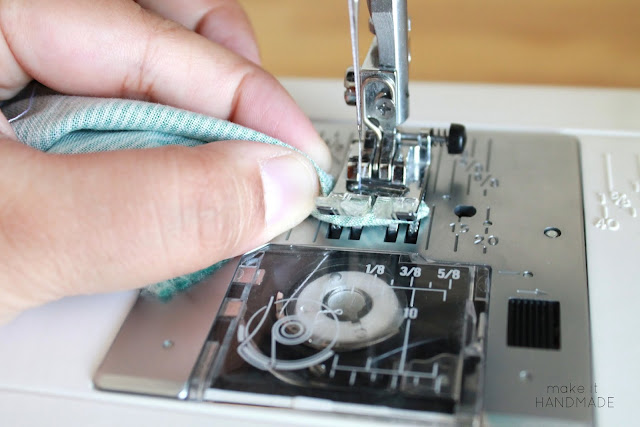
Now grab that little twist, and stuff it under your presser foot. To keep my tucks consistent in sized; I tried to line up the point of my twist with the edge of my presser foot.
The Twist Pillow-- Free tutorial for a fun smocked throw pillow. | www.makeithandmade.com
Now, just back stitch over the the twist. You'll have something that looks like this:
The Twist Pillow-- Free tutorial for a fun smocked throw pillow. | www.makeithandmade.com
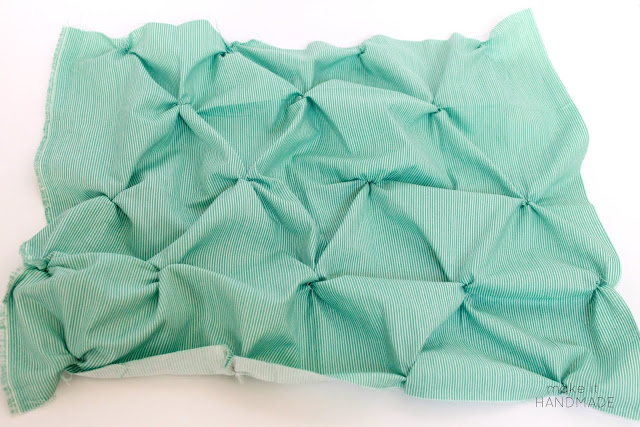
Not very pretty, eh? But when you look at the right side, you'll see the most adorable little tuck ever created.
The Twist Pillow-- Free tutorial for a fun smocked throw pillow. | www.makeithandmade.com
awww.....

Now just do this for the rest of the marked dots. I had good luck with doing 3-4 tucks before cutting the thread-- the sewing went very quickly this way. Make sure you double check that you made a tuck for each point you marked-- I missed a few in the picture below :)
The Twist Pillow-- Free tutorial for a fun smocked throw pillow. | www.makeithandmade.com
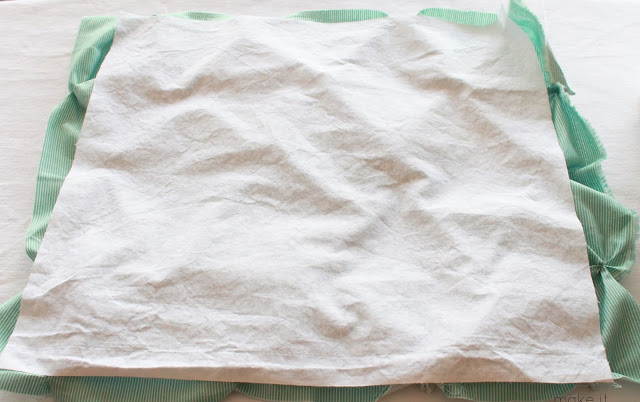
Luckily I caught it before finishing the pillow. To finish up, cut your pillow backing fabric to 15 inches, and place it right sides together with the smocked piece you just finished. You can see that this part won't be perfect. Just smooth out the smocked piece as best you can.
The Twist Pillow-- Free tutorial for a fun smocked throw pillow. | www.makeithandmade.com

Pin every inch or so around the edge of your backing fabric. If you come across a tuck or fold, make sure to pin that in, so the smocked design appears to wrap around the pillow.
The Twist Pillow-- Free tutorial for a fun smocked throw pillow. | www.makeithandmade.com

Then, (after changing the machine back to its normal settings) sew along 3 sides of the backing fabric. You can now trim the extra fabric if you wish. I didn't trim because I wanted the corners of the pillow to be soft and rounded.
The Twist Pillow-- Free tutorial for a fun smocked throw pillow. | www.makeithandmade.com

Turn your pillow right side out, and stuff your pillow form in. Then hand sew the fourth side closed using the magic stitch.

All that's left to do is to enjoy your pillow. :)
The Twist Pillow-- Free tutorial for a fun smocked throw pillow. | www.makeithandmade.com

I was hopeful that this pillow would add a splash of color to our living room. Instead, it's been commandeered as a mattress for my son's favorite bear and dear friend, Zoomi.
The Twist Pillow-- Free tutorial for a fun smocked throw pillow. | www.makeithandmade.com

Truth be told,  I couldn't think of a better use. I hope your pillow is just as loved! 

Thursday, August 22, 2013

I Heart Organizing Sewing Contributor!

One of my favorite blogs to visit each morning is I Heart Organizing. Not because I'm a huge fan of housework-- not at all. But Jen has a way of making even the mundane seem beautiful. Like these drawer organizers from cereal boxes.

I found her blog when looking for baskets to fit in our Ikea Expedit and simply fell in love. After a few months of reading, I got up the courage to ask her if she needed any sewing projects. 

All this to say... I absolutely thrilled to be I Heart Organizing's newest contributor! You can see my bio on the 'Meet The Team' page. (Scroll down to the very bottom). I feel famous! 

 I'll be sharing fun, simple sewing projects for the home. The other contributors are incredibly talented, and I've been wracking my brain for stellar project ideas. My first post goes up next week and I'm super nervous!I hope to see you all over there!

Monday, July 29, 2013

Making Home: Fitted Tablecloth

Finally, a Making Home post... This series has gone nearly a month without any update!

 In my defense, I have been doing things around the house, and have even taken some pictures, but somehow other posts have taken priority. I'll admit it-- home dec sewing is not my favorite kind of sewing. Lots of straight lines and finicky measuring and cutting.

That being said, I find that home dec projects are the ones that save me the most money, and I really, really, do like saving money.

Last Christmas, we got my kids a KidKraft table  (affiliate link). The table is used more than any other table in our home (even our kitchen table). My kids eat lunch and snack there, they craft there, and the table serves as an overflow when our regular table is occupied with dinner guests.
A sewn fitted stay put table cloth for a child's table. Project by Make It Handmade as part of the Making Home Series
Making Rainbow Knitting Needles

It's sturdy enough that my kid's grandparents often join them for dinner at their table (instead of sitting with boring old us!) We can tell the table is going to be used and enjoyed for far longer than we had anticipated, and I wanted to protect the top a bit better.

This project was a quicky, and completely inspired by Jess of CINO. Head on over to her blog for her Fitted Tablecloth Tutorial.

A sewn fitted stay put table cloth for a child's table. Project by Make It Handmade as part of the Making Home Series

I followed her tutorial to the letter for the tablecloth part-- except that I used a cheap flannel backed vinyl instead of oilcloth.

A sewn fitted stay put table cloth for a child's table. Project by Make It Handmade as part of the Making Home Series
 For the binding, I cut bias strips from my kids super hero capes (don't judge-- they weren't using them!) And used the anti bias tape mafia method of attaching them.
A sewn fitted stay put table cloth for a child's table. Project by Make It Handmade as part of the Making Home Series
 I also topstitched the seam allowance down to keep it looking neat. Much easier and faster than the traditional method.
A sewn fitted stay put table cloth for a child's table. Project by Make It Handmade as part of the Making Home Series

A table cloth, and it cost me just under 3 dollars out of pocket! I just need to make another one for our 'big' table. I'm keeping my eye out for an inexpensive vinyl. If you know of any; drop me a line!

See you back here tomorrow for another fun home dec project!